
By Dawn Weber
Board Member-at-Large, St. Louis Wild Ones
 In the United States, to kick off a race, we usually use “On your mark, get set, go!” but I have many work colleagues from London that instead say “Ready, steady, go!”, which leads me to the next photo tip in the series.
Sometimes, blurred motion in a photograph is desirable to create a dramatic scene, but usually when I choose a photo to keep or share, I want it to be sharp, with crisp lines, so that I can see the detail. Even the slightest movement of my body, the camera, or the subject can cause the photo to be less than sharp. Sometimes it seems like an insurmountable challenge, but there are several small techniques that help me be steady. This post will focus on body and camera movement.
On a a recent trip to a Florida birding festival, I signed up for an opportunity to see red-cockaded woodpeckers, and the best chance to see them is just after sunrise when they come out of their nest cavities. It was still fairly dark when they made their move.
Where to start?
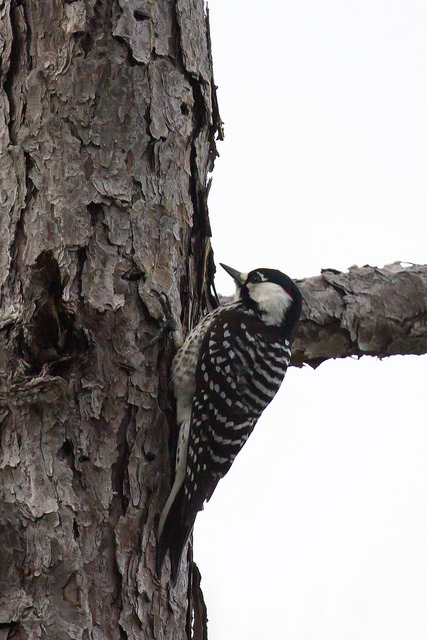
Red-cockaded woodpecker in Florida
I didn’t take a tripod along, but I was able to find a tree that I could lean my back against to gain some stability.
- I use a fence or deck railing, a tree, a building, or a car – whatever stable objects are nearby, to set the camera on, rest the camera against, or to steady myself.
- If I’m standing out in the open and there’s nothing else around, I angle my body toward the subject, keeping my arms close to my body and my feet shoulders width apart. This creates the support that I need. If I’m reaching away from me, leaning or straining to stay in place, I don’t have as much control. When the camera I’m using has a rear LCD display and a viewfinder, I prefer the viewfinder because the camera then rests against my face, adding stability.
- Sometimes the best angle for a photograph is from the ground. In these cases I lie down on the ground and use my elbows to steady myself.
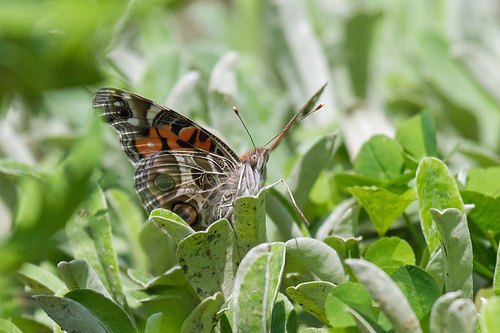
American lady butterfly
I used this technique when taking photos of an American lady butterfly laying eggs on the pussytoes (Antennaria neglecta) in my garden. If the photo had been taken from a standing position, the viewer’s connection with the butterfly would not be the same.
- Using a monopod or a tripod helps me be steady, especially when taking close-up photos. When I’m on a bird field trip or wildflower walk, I tend to go hand-held because we’re moving around a lot. If I’m watching for something specific in the yard and waiting for the right moment, a tripod is the right choice.
- When I’m using a camera with a shutter button, I press halfway to focus, then gently squeeze with no more pressure than is necessary to take the photo. This minimizes the movement of the camera at the critical snapping moment.
- Even breathing causes my body to move. By taking a deep breath, exhaling about halfway, then pressing the shutter button, that extra movement is reduced.
- Remember to stay still until the photo is completed and the shutter is opened and closed. Sometimes, when I’m in too much of a hurry, I move before the photo is completely taken, leading to a blurry image, which takes me back to the beginning of the process.
This post is the third in a photography series:
Many of us wander around our gardens and snap quick photos to share with others, to send away for identifications, or maybe to show off a cool insect that we found. Unfortunately, the results can be disappointing, blurry, too dark, or too light. Don’t dismay, help is on the way! This photography series will give you tips to build your camera skills for taking photos of native plants and all of the visitors that come with them. The aim is to post a few tips for each type of camera: smartphone, point-and-shoot, and DSLRs. With all of the spring flowers starting to bloom, there are new photo opportunities popping up every day.
Next tip: Subjects that move – What to do?
Previous tips in the series:
Photography tip #1 – Sometimes close is too close
Photography tip #2 – Macro mode for close-ups
[Editor’s Note: Member Dawn Weber’s photo of wild bergamot (Monarda fistulosa) guttation, titled “Under Pressure” won “People’s Choice” for the Wild Ones 2015 photo contest.]

Dawn, this series is so well done and so helpful. You might consider sending one or all three to Wild Ones National for use in their May/June/July issue of the Journal. It would go really well with any mention they make of the June deadline for the 2016 photo contest.
I agree with Marsha.